
Using Long Exposure Photos to Clone Your Subject
I captured my subject multiple times in one photo. In this blog, I will teach you how to do it too! It is a pretty simple concept that can open up new creative options for you in your photos. The key to doing this is using shutter speed to your advantage.
Understanding Shutter Speed and Long Exposures
For this photo, I used a very slow shutter speed, otherwise known as a long exposure. My shutter speed was set to 30 seconds and during that time, I captured my subject four times. In the reset of this section, I will discuss what shutter speed is, how it affects your photos, and how to control it for long exposure photos. If this does not sound like new information to you, skip ahead to the next section.
Shutter speed is one of the three camera settings that makes up the exposure triangle (the other two being aperture and ISO). It is the amount of time that you camera sensor is capturing light. For example, if you have you shutter speed set to 1/200, that means that the sensor will be collecting light for 1/200th of a second. Depending on your camera, this will be done by having a physical shutter quickly snapping open and closed, or using software to control how long your sensor is sensitive to light.
the slower your shutter speed is, the more motion blur there will be in the moving parts of your image. Faster shutter speeds will freeze movement in place because your subject/camera does not have enough time to move very far in that fraction of a second. Shutter speed also affects the exposure of your images. The slower your shutter speed is, the longer you sensor will be collecting light for, and the brighter your image will be.
On most cameras, 30 seconds is the slowest you can set your shutter speed to in manual mode to. If you need a slower shutter speed, you’ll need to set your camera to “bulb mode”. This can be done on most cameras by switching the mode dial to B. Bulb mode is similar to manual mode except instead of setting a shutter speed, your shutter will remain open for however long you press the shutter button. If you have an external shutter release or an app that connects to your camera, you will be able to toggle the shutter open and closed which can be easier to manage and not introduce and unintentional camera shake.


How to Freeze Motion in a Long Exposure
So if very slow shutter speeds will cause a lot of motion blur, how do we freeze that movement to keep our subject sharp? It is simple, you use an external flash. When you fire your flash during a long exposure, anything that is hit by that quick burst of light is frozen in place in your image. If you do not have an external flash, you might be able to get away with a regular light, but you’ll need to be able to turn it on and off incredibly quickly. Think of the amount of time your light is on as another “shutter speed” within your long exposure. If your light is on for 1/250th of a second, its like adding an image in your long exposure set to 1/250 shutter speed. If you’re slow with the light, it’s equivalent to a slow shutter speed and you’ll still see that motion blur.
A flash is best because it is a simple button press to fire it and you can adjust the brightness easily. I’d recommend you own a flash anyways, it will come in handy on so many occasions as a photographer and knowing how to use one is an important skill to have. If you’re not planning on doing studio work ,you can get away with using a cheap flash that won’t have many features, but will get the job done.
Creating the Clones
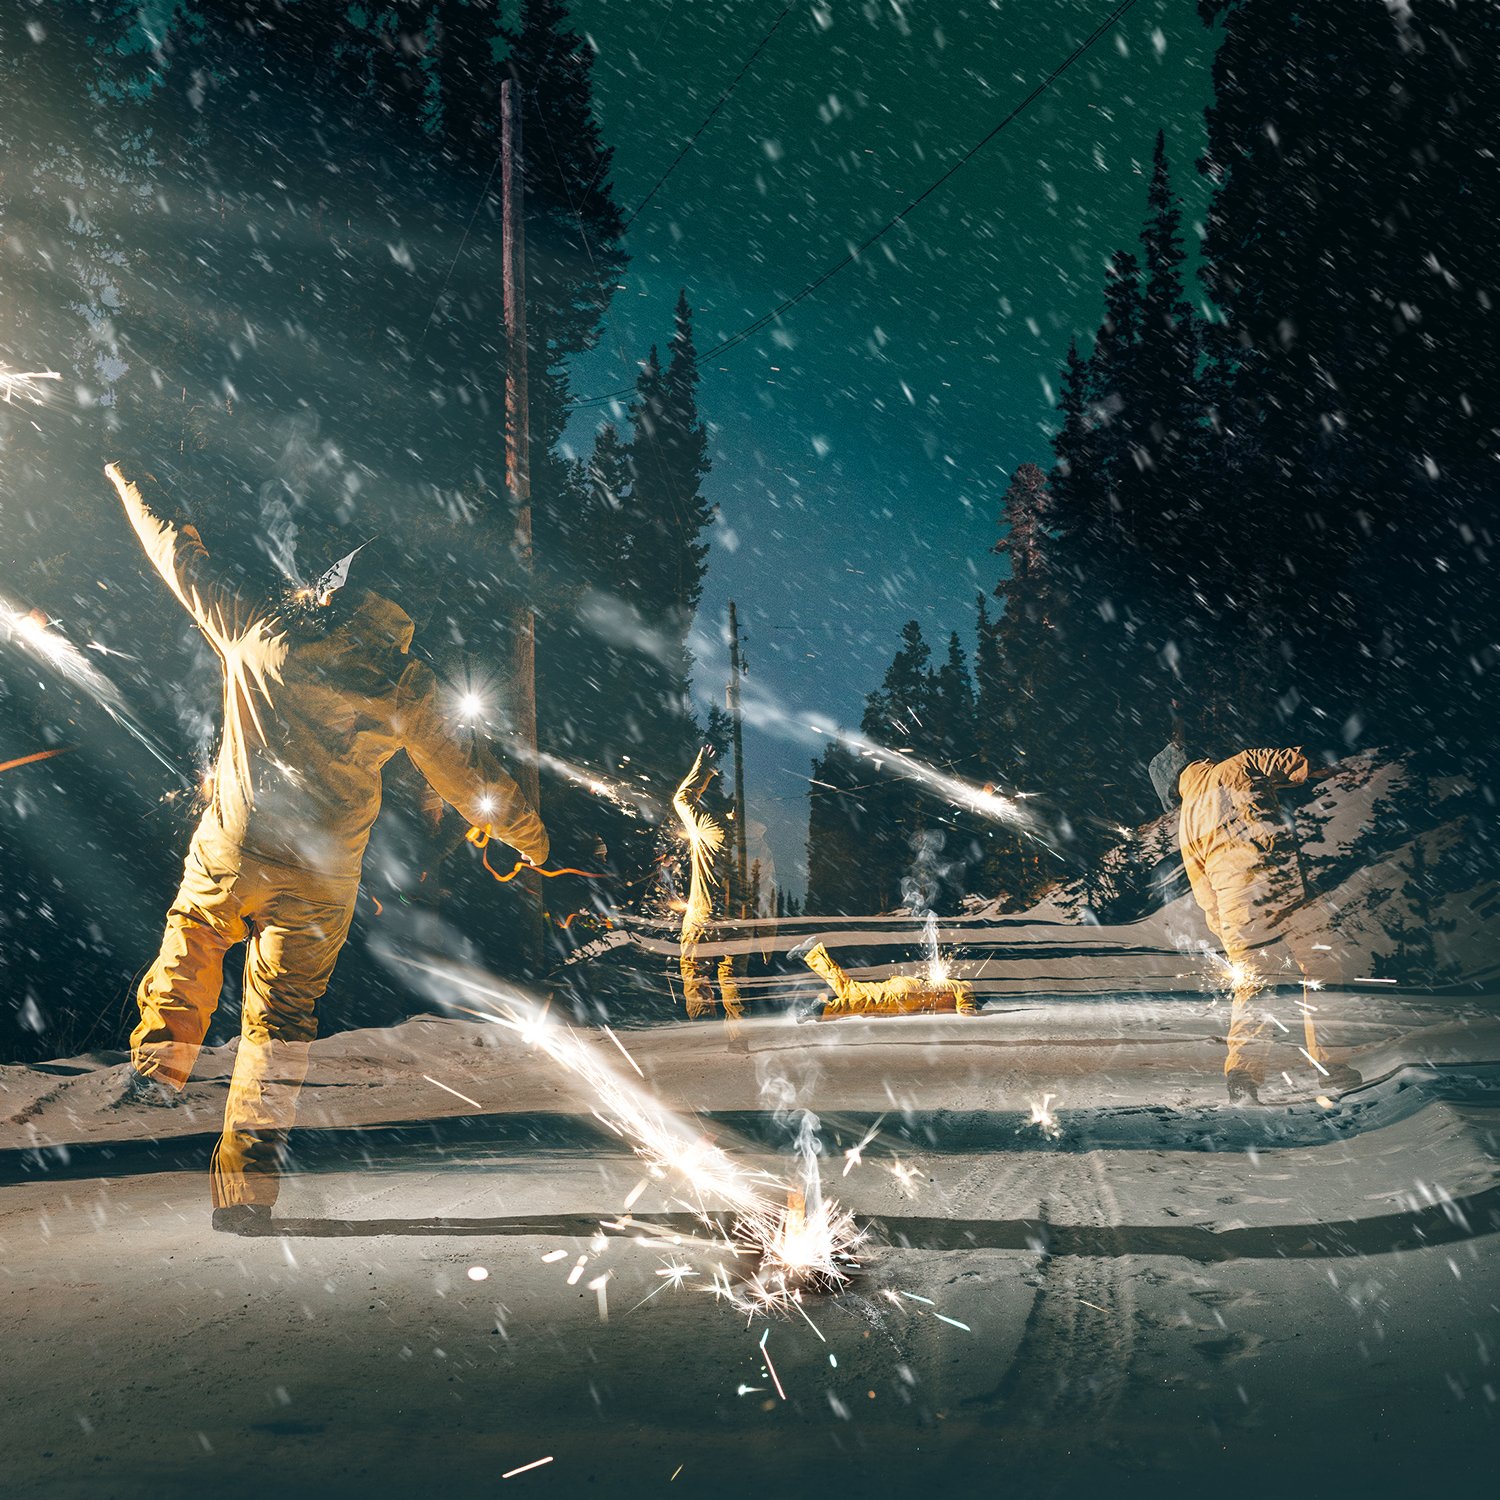
Each time you fire your flash, a new “clone” will be created. In my photo, I fired my flash four times during the 30 seconds the shutter was open. Getting both the exposure of your background and the exposure of your subjects right is a bit of a tricky balancing act. My recommendation is to dial in the exposure of your background, using a shutter speed that will be long enough to create the image you are going for, then adjusting the brightness of your flash to get the exposure of your subject right.
In this photo, I ran alongside my subject, firing the flash periodically. Try to keep the angle of the flash relative to your subject consistent throughout the long exposure and try to match the angle of your flash to the angle that the natural light is coming in. This will help make your subjects look like they naturally belong in the lighting scenario. Also keep in mind that the distance from your flash to your subject will effect it’s “brightness”. You’ll see that in my photograph, two of the clones look a bit transparent like ghosts. This is because for those two, I was farther away with the flash, reducing the intensity of the light hitting them. this was an intentional choice since I liked the way it looks, but if you don’t want any ghosts in your photo, make sure your light is bright and close enough to keep your subject in this ethereal plane.
Since I was running around through the frame and the light from the flash never touched me, I am not visible at all in the photo. If you can see yourself as a dark wisp moving though the photo, try slowing your shutter speed, lowering your exposure with aperture and ISO, and brightening up your flash.
Have Fun and Get Creative
That’s it! Everything else in this photo was achieved through some Photoshop magic. There are so many ways you could use this technique beyond creating clone of your subject. I’ll give you a couple of other cool examples. Try Mounting your flash directly on your camera so It fires when the shutter first open, then move the camera around while the shutter is still open. This will create a sharp subject in an otherwise blurry photo. Also try having your subject move through the frame then fire the flash at the end when they strike a pose. This will make it look like you captured their soul leaving/entering their body.
Want to Learn More?
If you enjoyed this and want to learn more cool photography tips and techniques, then you’ll love my monthly newsletter! It contains interesting topics on all things photography, see you there!